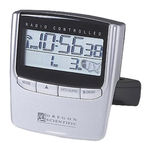
Congratulations on purchasing the RM826 Radio Controlled Travel Clock.
The RM826 is a clock that automatically sets the time and date from signals
broadcast by the U.S. Atomic Clock, one of the world's most accurate
timekeepers.
RADIO CONTROLLED
This extraordinary timepiece, located outside Boulder, Colorado, is operated
by the U.S. Department of Commerce's National Institute of Standards
and Technology.
TRAVEL CLOCK WITH HiGlo
Your RM826 Clock automatically activates its receiver immediately upon
battery insertion and then six times every 24 hours and makes any necessary
adjustments in its time display. The clock not only sets itself to synchronize
its digital time and date with the atomic clock's signals, but it also
automatically adjusts for Daylight Saving Time.
MODEL : RM826
Automatic setting of clock by radio signal from the U.S. Atomic Clock
Time display with Hour, Minutes, Seconds and Date
Day of the Week displayed in one of five languages (English, French,
German, Italian or Spanish)
Blue HiGlo
electroluminescent backlight
Alarm with eight-minute snooze
Crescendo Alarm increases in volume and intensity
Signal Reception Strength indicator
U.S. Map icon shows user selected time zone
Automatic adjustment for Daylight Saving Time
Low Battery indicator
Description of Function buttons (Figure A)
Snooze/light (Figure A.1)
Pressing the Clock back on its stand activates the "lite-touch" feature of
your RM826 Travel Clock.
button (Figure A.2)
This button is used for manually setting the time, alarm time or calendar
functions. Please, refer to the section "MANUALLY SETTING: TIME,
YEAR, MONTH, DATE & LANGUAGE", for further information."
NOTE : Pressing the
button once to advance the setting by increments
of 1: holding the button down for more the three seconds will accelerate
the setting to rapid advance mode.
WARNING : The
button also is used to reactivate the signal reception
process should it become disabled. Please see the "TROUBLESHOOT-
ING" section for further information.
ZONE (Figure A.3)
The RM826 Travel Clock is designed to automatically adjust the time signal
to the user-selectable North American time zone – Pacific, Mountain,
Central or Eastern. Pressing the ZONE button once advances the time
zone setting (see U.S. map figure A.9). Once the desired time zone block is
highlighted on the map, the time will automatically adjust accordingly.
WARNING : Do not press and hold the ZONE button for more than three
seconds. Use the single press method to set the time zone. Holding the
button will turn off the automatic time signal reception. Please see the
"TROUBLESHOOTING" section for further information.
ON/OFF (Figure A.4)
This button turns the alarm function on and off. Touching the
button one time will either turn the alarm on or off. Please refer to the
"SETTING THE ALARM" section for further information.
NOTE : When setting the alarm time, the alarm is automatically turned
on. If the bell icon [
] is visible, the alarm is "on".
Touching the ON/OFF button one time will either turn the Alarm function
If you want to stop the daily alarm while leaving the pre-set time for the
following day's wake-up, press the DATE / ALARM or
button. Pressing the
ON/OFF button once more to stop the wake-up
alarm will deactivate the alarm function.
MODE (Figure A.5)
Press the MODE button once to switch between the display of either the
Day of the Week or Seconds on the clock. The RM826 Travel Clock will
continue to display the selected function (Day or Seconds) until the MODE
button is pressed again.
IMPORTANT: Holding the MODE for more than three seconds turns on
the manual mode for setting the time, date, year and language (English/
French/ German/ Italian/ Spanish). Please refer to this section for specific
setting instructions.
DATE/ALARM (Figure A.6)
Press the DATE/ALARM button once to show the alarm time.
The ((•)) icon is displayed in the lower left portion of the screen to alert
you that the display is showing the alarm time. To return to the month and
date display, press the DATE/ALARM button once. To set the alarms
please refer to the "SETTING THE ALARM" section for more information.
Description of LCD Display
Please refer to Figure A for a detailed description of RM826 Travel Clock
LCD display and refer to the appropriate section(s) of the these instructions
You may need to reposition the clock for maximum reception.
for more specific information.
RF appliances and radios, such as the Radio Controlled Alarm Clock,
perform best when placed near a window.
Signal Strength Indicator – Figure A.7
After receiving the initial signal, updates are accomplished with greater
ease. Even though there are areas that may have more difficulty in receiving
INDICATORS
a signal, the RM826 Alarm Clock contains very accurate quartz movement
and will retain precise time even if a signal is missed on a rare occasion.
ON THE DISPLAY
Your last signal reception was excellent and time
SETTING THE ALARM
Synchronization with the U.S. Atomic Clock has
1) Press and hold the DATE/ALARM button for at least three seconds.
taken place.
The "Hour" Segment of the alarm time will begin Flashing.
2) While the "Hour" segment is flashing press the [
Your last signal reception was insufficient and it
desired hour time (please note the AM/PM designation).
is recommended that you reposition the clock.
3) When the desired hour time is reached, press the DATE/ALARM
The displayed time has been manually set and is
button again.
not synchronized by the RF signal.
4) The "Minutes" segment of the alarm time will begin flashing.
Your radio reception is disabled and no signal re-
5) While the "Minutes" segment is flashing press the [
No indicator
the desired minute time.
ception will be initiated unless it is enabled again.
6) When the desired minute time is reached press the DATE/ALARM
Time Display (Figure A.8)
button again to exit the alarm time set mode.
NOTE: As soon as any change in the alarm time is made the alarm icon
The top line of the display shows the hours, minutes and seconds (AM/
] will automatically appear indicating that the alarm is activated.
PM) of the clock. Pressing the MODE button once will switch the
"Seconds" display to the Day of the Week. The RM826 Travel Clock will
continue to display the selected function (Day or Seconds) until the MODE
TURNING THE ALARM ON or OFF
button is pressed again.
To turn the alarm on or off simply press the
US MAP (Figure A.9)
When the crescendo alarm sounds, it may be turned off using one of the
following methods.
This map represents the four optional time-zone settings. The darkened
zone block indicates the user selected time zone.
1) If the SNOOZE/LIGHT button is pressed within two minutes the
Snooze is activated and the alarm will sound again in 8 minutes.
NOTE: When the RM826 Travel Clock is receiving a signal from the U.
S. Atomic Clock; the outline of this map will flash.
2) If the DATE / ALARM or
will not sound again until the next day.
Month/Date (Figure A.10)
will not sound again until it is activated.
The second line of the display shows the Month and the Date. Pressing the
ALARM button once will switch the "month and date" to show the "alarm
MANUALLY SETTING: TIME,YEAR, MONTH,
time". The Alarm time is displayed in hours and minutes (AM/PM).
DATE & LANGUAGE
NOTE: The Time RM826 Travel Clock will continue to display the selected
function (Month/Date or Alarm Time) Until the ALARM button is pressed
NOTE: It is highly unlikely you should ever have the desire (or need) to
manually set the clock time, year, month or date of the Radio Controlled
Travel Clock. However, in the event this becomes necessary please review
((•)) Alarm Display indicator (Figure A.11)
the following.
This ((•)) icon indicates the second line of the display is showing Alarm
Setting the Time
1) Press and hold the MODE button for at least three seconds. The "Hour"
] Alarm "ON" Indicator (Figure A.12)
segment of the clock time will begin flashing.
] icon indicates that the alarm function is activated.
2) While the "hour" segment is flashing press the [
desired hour time. (Please note the AM/PM designation)
[BATT] Low Battery Indicator (Figure A.13)
3) When the desired hour times reached press the MODE button again.
The "Minutes" segment of the clock time will begin flashing.
] icon indicates that it is time to change batteries.
4) While the "Minutes" segment is flashing press the [
the desired minutes time.
Slide Lock Switch (Figure A.14)
5) When the desired minutes time is reached. Briefly press the MODE
When the slide lock switch is in the "lock position". The settings of the
button five more times to exit the clock time set mode.
clock will be locked. You will be unable to make any changes to the settings.
IMPORTANT: As soon as any manual change in the clock time is mode,
This is a useful feature especially when you are in transit. To unlock, slide
there is a loss of the signal strength indicator from the display.
the switch back to the "unlock position" (i.e., to the left).
Setting the Year Month and Date
BATTERY INSTALLATION
1) Press and hold the MODE button for at least three seconds. The "Hour"
Your RM826 Travel Clock is shipped with two AAA batteries. These
segment of the clock time will begin flashing.
batteries should last for approximately one year depending on how frequent
backlight is used.
2) Briefly press the MODE button and the "Minutes" segment will begin
3) Briefly press the MODE button once more. The clock time will
Radio Controlled Clock:
disappear and be replaced by a flashing year (Ex. 2005). This is the
The RM826 will automatically synchronize current time and date with the
year set mode.
signal broadcast by the U.S. Atomic Clock when the product is in reception
4) While the "Year" segment is flashing press the [
range of the signal.
desired year.
When the unit is new and just out of the box, synchronization with the U.S.
5) When the desired year is reached briefly press the MODE button and
Atomic Clock can take up to 72 hours. The unit will receive the most
the "Month" digit will start flashing.
dependable and interference-free signal automatically between midnight
6) Press the [
7) Press the MODE button to confirm the "month" and the "date" digits
When the unit is receiving a radio signal, the reception icon will start to
will flash.
blink. The reception icon will show either strong, weak or no signal
depending on the strength of the radio signal. A complete reception generally
8) Press the [
takes about two to 10 minutes.
9) Press the MODE button to confirm the "Date" and the Language dis-
play will flash".
10) Press the [
the display ("E" for English, "F" for French, "D" for German, "I" for
Italian and "S" for Spanish).
11) Press the MODE button one more time to exit the set mode and re-
sume normal time keeping.
When the reception is completed the reception icon will stop blinking. The
reception icon will show [
] for no Reception or [
] for successful
reception. For best signal reception, place the RM826 away from other
equipment that emit Radio Frequency (RF) or microwave signals such as
TV's, radios, PC's or microwave ovens. Other causes for signal interference
include electrical power transmission towers, steel reinforced concrete
construction, and/or metal siding.
TROUBLESHOOTING
No Display
Check battery compartment.
Confirm that batteries are of good quality and
are installed correctly
Be certain the plastic protective tabs have been
Did not receive
If the units are new and just out of the box,
A time signal
allow 60-72 hours for the clock to
automatically seek a signal between midnight
] button to set the
May be caused by too much interference.
Relocate the clock or the antenna to position
near a window.
Be certain the antenna cord is fully extended
] button to set
and look for low battery indicator.
Loss of Signal
May be caused by interference.
If the problem persists, move the clock or
antenna to a new location. The clock is
equipped with a high quality clock
mechanism, which insures accuracy between
ON/OFF button in any
SPECIFICATIONS
Integrated radio receiver for reception of time signal 10kW transmitter
WWVB: at 60kHz
Operating temperature: 35°F to 120°F (2°F to 49°C)
Typical operating time on one battery set is up to one year, subject to
backlight usage
ON/OFF button is pressed, the alarm
Setting time with interference-free reception: 2-10 minutes
Automatic signal-reception activation: six times every 24 hours
ON/OFF button is pressed again, the alarm is deactivated and
backlighting source: Electroluminescence
Battery type: 2 AAA (included)
ABOUT OREGON SCIENTIFIC
Visit our website (www.oregonscientific.com) to learn more about
Oregon Scientific products such as digital cameras; MP3 players;
children's electronic learning products and games; projection clocks;
health and fitness gear; weather stations; and digital and conference
phones. The website also includes contact information for our customer
care department in case you need to reach us, as well as frequently asked
questions and customer downloads.
We hope you will find all the information you need on our website,
however if you're in the US and would like to contact the Oregon
Scientific Customer Care department directly, please visit: www2.
] button to set the
oregonscientific.com/service/support OR Call 949-608-2848.
For international enquiries, please visit: www2.oregonscientific.com/
about/international/default.asp
] button to set
FCC STATEMENT
This device complies with Part 15 of the FCC Rules. Operation is subject
to the following two conditions: (1) This device may not cause harmful
interference, and (2) This device must accept any interference received,
including interference that may cause undesired operation.
WARNING: Changes or modifications to this unit not expressly
approved by the party responsible for compliance could void the user's
authority to operate the equipment.
NOTE: This equipment has been tested and found to comply with the
limits for a Class B digital device, pursuant to Part 15 of the FCC Rules.
These limits are designed to provide reasonable protection against
harmful interference in a residential installation.
This equipment generates, uses and can radiate radio frequency energy
and, if not installed and used in accordance with the instructions, may
cause harmful interference to radio communications. However, there is
] button to set the
no guarantee that interference will not occur in a particular installation.
If this equipment does cause harmful interference to radio or television
reception, which can be determined by turning the equipment off and
on, the user is encouraged to try to correct the interference by one or
] button until the desired month appears on the display.
more of the following measures:
Reorient or relocate the receiving antenna.
Increase the separation between the equipment and receiver.
] until the desired date appears on the display.
Connect the equipment into an outlet on a circuit different from that
to which the receiver is connected.
Consult the dealer or an experienced radio / TV technician for help.
] button until the desired language indicator appears on
DECLARATION OF CONFORMITY
The following information is not to be used as contact for support or
sales. Please call our customer service number (listed on our website at
www.oregonscientific.com), or on the warranty card for this product)
for all inquiries instead.
Oregon Scientific, Inc.
19861 SW 95th Place, Tualatin, Oregon
Telephone No.: 1-800-853-8883
1-503-684-3332
declare that the product
Product No.:
Product Name: Radio Controlled Travel Clock With HiGlo
Manufacturer:
IDT Technology Limited
Block C, 9/F, Kaiser Estate, Phase 1,
41 Man Yue St., Hung Hom, Kowloon,
is in conformity with Part 15 of the FCC Rules. Operation is subject to
the following two conditions: 1) This device may not cause harmful
interference. 2) This device must accept any interference received,
including interference that may cause undesired operation.
DATE/SONNERIE (Figure A.6)
Appuyez sur la touche DATE/ALARME une seule fois pour l'affichage
Nous vous félicitons d'avoir acheté le Réveil de Voyage Radiocommandé
de l'heure de la sonnerie.
L'icône ((•)) s'affiche en bas à gauche de l'écran pour vous prévenir que
Le RM826 est un réveil avec réglage automatique de l'heure et de la date à
l'affichage indique l'heure de la sonnerie. Pour revenir à l'affichage de la
partir des signaux émis par l'horloge atomique américaine, qui est l'une
date et du mois, appuyez à nouveau une fois sur la touche DATE/
des plus ponctuelles du monde. Cette horloge extraordinaire, qui se trouve
SONNERIE. Pour régler la sonnerie, veuillez vous reporter à la section
un peu à l'extérieur de Boulder, au Colorado, est gérée par l'Institut National
concernant la sonnerie.
de Normalisation et de Technologie du Ministère du Commerce des Etats
Description de l'afficheur à cristaux liquides
Le récepteur de votre RM826 est automatiquement activé lors de l'insertion
Veuillez vous reporter à la Figure A pour une description détaillée de
des piles, puis ensuite 6 fois par 24 heures, activations durant lesquelles
l'affichage à cristaux liquides du Réveil de Voyage RM826 et reportez
les réglages de l'affichage de l'heure se font. Le réveil non seulement se
vous aux sections concernées pour de plus amples informations sur les
règle de lui-même pour synchroniser son heure et sa date numérique avec
instructions à suivre.
les signaux de l'horloge atomique, mais il s'ajuste également
automatiquement à l'heure d'hiver.
Indicateur d'intensité des signaux - Figure A.7
Signification des
indicateurs
Caractéristiques
Réglage automatique du réveil par signaux radio émis par l'horloge
atomique américaine.
Affichage des heures, des minutes, des secondes et de la date.
Pas d'indicateur
Jours de la semaine en 5 langues suivantes (Anglais, Français,
Allemend, Italian ou Espagnol)
Rétro-éclairage électroluminescent bleu HiGlo
Sonnerie avec rappel de sonnerie de huit minutes
Affichage de l'heure (Figure A.8)
Sonnerie allant crescendo en volume et intensité
La ligne supérieure affiche les heures, les minutes et les secondes (AM et
Indicateur d'intensité de réception des signaux
PM) du réveil. En appuyant sur le bouton MODE une seule fois, vous
Icône de la carte des Etats Unis pour la sélection de zones horaire
passez de l'affichage des «secondes» à celui des «jours de la semaine». Le
Ajustement automatique à l'heure d'hiver
Réveil de Voyage RM826 continuera à afficher la sélection désirée (Jours
ou Secondes) jusqu'à ce que vous appuyiez à nouveau sur le bouton MODE.
Indicateur de piles faibles
Carte des ETATS UNIS (Figure A.9)
Description des touches de fonction (figure A)
Cette carte représente les 4 zones horaires à sélectionner. Le bloc le plus
Rappel de sonnerie / Eclairage (Figure A.1)
foncé indique l'heure à laquelle est réglé le réveil suite au choix de
En appuyant au dos du réveil sur son stand, vous activez la fonctionnalité
l'utilisateur.
«lumière par contact» de votre réveil de voyage RM826.
NOTE: quand le Réveil de Voyage RM826 reçoit un signal de l'horloge
atomique américaine, les contours de la carte clignotent.
D- Touche flèche vers le haut (Figure A.2)
Cette touche est utilisée pour régler manuellement les fonctions heure,
Mois/Date (Figure A.10)
sonnerie ou calendrier. Veuillez vous reporter à la section « REGLAGE
La deuxième ligne de l'affichage indique le mois et la date. En appuyant
MANUEL DE L' HEURE, DE L' ANNEE, DU MOIS, DE LA DATE ET
sur le bouton sonnerie une fois, vous passez du «mois et de la date» à l'
DE LA LANGUE» pour de plus amples informations.
«heure de sonnerie». L'heure de la sonnerie est indiquée en heure et min-
NOTE: en appuyant sur la touche flèche une fois, vous augmentez le réglage
utes (AM et PM).
de 1. En appuyant sur la touche sans la relâcher pendant plus de trois
NOTE: Le Réveil de Voyage RM826 continuera à afficher la sélection
secondes, vous accédez au mode de réglage avance rapide.
désirée (Mois/ Date ou Heure de la sonnerie) jusqu'à ce que vous appuyiez
ATTENTION: La [
] touche est aussi utilisée pour réactiver le processus
à nouveau sur le bouton SONNERIE.
de signal de réception si il est désactivé. Veuillez vous reporter à la section
dépannage pour de plus amples informations.
((•)) Indicateur d'affichage de Sonnerie (Figure A.
ZONE ((Figure A.3)
L'icône ((•)) indique que la deuxième ligne de l'affichage indique l'Heure
Le réveil de voyage RM826 est conçu pour ajuster son signal heure sur la
de la Sonnerie.
zone horaire Nord- Américaine – Pacifique, Rocheuses, Prairies ou Est.
Appuyer sur le bouton ZONE une fois vous fait avancer d'une zone (voir
carte des USA figure A.9). Une fois que le bloc de la zone horaire désirée
est éclairé sur la carte, le réglage de l'heure se fait automatiquement.
(Figure A.12)
ATTENTION: N'appuyez pas sur le bouton ZONE horaire plus de trois
Cette icône [
secondes. Nous vous recommandons de procéder à la sélection en appuyant
une seule fois à la fois. Un appui prolongé sur ce bouton arrêtera le signal
[BATT] Indicateur de piles faibles
de réception automatique. Veuillez vous reporter à la section dépannage
(Figure A.13)
pour de plus amples informations.
Cette icône [
] ON/OFF (Figure A.4)
reporter à la section concernant le Remplacement des Piles de ce manuel.
Ce bouton active ou arête la fonction sonnerie. Un seul appui sur ce [
Interrupteur de Verrouillage (Figure A.14)
bouton ON/OFF la sonnerie. Veuillez vous reporter à la section Réglage
de la Sonnerie pour de plus amples informations.
Lorsque l'interrupteur de verrouillage est dans la position «verrouillage»,
NOTE: Lorsque vous réglez l'heure de la sonnerie, la sonnerie est
les réglages du réveil sont verrouillés. Vous serez alors dans l'incapacité
automatiquement activée. Si [
] l'icône avec la cloche est visible, la
de modifier ces réglages. Ce dispositif est particulièrement utile lorsque
sonnerie est sur «on».
vous voyagez. Pour déverrouiller, repoussez l'interrupteur en arrière, c'est
à dire vers la gauche.
Si vous appuyez une fois sur le bouton ON/OFF, la fonction sonnerie sera
sur ON ou sur OFF.
MISE EN PLACE DES PILES
Si vous désirez arrêter la sonnerie du jour tout en laissant l'heure pré-
réglée pour le jour suivant, appuyez sur le bouton DATE/SONNERIE ou
Votre Réveil de Voyage RM826 est expédié avec 3 piles AAA. Ces piles
sur le bouton [
dureront approximativement une année dépendant de l'utilisation que vous
faites du rétro-éclairage HiGlo
Si vous appuyez à nouveau sur le bouton [
] ON/OFF, l'alarme s'arrête
et elle se désactive.
Réveil radiocommandé:
Le Réveil de Voyage RM826 synchronise automatiquement l'heure et la
MODE (Figure A.5)
date avec les signaux émis par l'horloge atomique américaine lorsque le
Appuyez sur la touche MODE une seule fois pour passer de l'affichage du
produit est à portée des signaux.
jour de la semaine aux secondes et vice versa. Le réveil de voyage RM826
Quand l'unité est neuve et vient juste d'être sortie de son emballage, le
continuera à afficher la fonction choisie (Jours ou Secondes) jusqu'à ce
temps de synchronisation avec l'horloge atomique américaine peut prendre
que vous appuyiez à nouveau sur la touche MODE.
jusqu'à 72 heures. La plage horaire durant laquelle le réveil reçoit les
IMPORTANT: en maintenant la touche MODE enfoncée plus de trois
signaux les plus clairs et le moins d'interférences est comprise entre minuit
secondes, vous passez sur le réglage manuel se l'heure, de la date, de l'année,
et 4 heures du matin.
et de la langue (Anglais/ Français/ Allemend/ Italian/ Espagnol). Pour des
Lorsque l'unité reçoit un signal radio, l'icône de réception se met à clignoter.
instructions précises à propos de ces réglages, veuillez vous reporter à la
L'icône de réception indiquera un signal fort, faible, ou pas de signal du
section concernée.
tout dépendant de l'intensité du signal radio. Une réception complète prend
en général entre 2 et 10 minutes.
Sur l'affichage
Votre dernier signal de réception était excel
lent et la synchronisation avec l'horlog atomique
américaine a eu lieu.
Votre dernier signal de réception était insuffisant
et nous vous recommandons de changer le réveil
de position.
L'heure affichée a été réglée manuellement et
n'est pas synchronisée avec le signal RF.
réception est désactivée et aucune réception de
signal n'aura lieu avant que vous ne réactiviez
la réception.
] Indicateur de sonnerie «ON»
] cloche indique que la fonction sonnerie est activée.
] indique qu'il est temps de changer les piles. Veuillez vous
Radio controlled travel clock with higlo backlight (2 pages)
Digital travel radio-frequency (rf) controlled clock (2 pages)
Digital travel radio-frequency (rf) controlled clock (2 pages)
Digital travel radio-frequency (rf) controlled clock (uk version rm823) (2 pages)
Cool atomic, with animated projection (19 pages)
Cool rf projection clock with animated projection (24 pages)
Travel radio-controlled projection clock (8 pages)
Travel radio-controlled projection clock (8 pages)
Radio controlled clock with higlo backlight (13 pages)
Radio controlled kids projection clock with nightlight (9 pages)
Radio-controlled projection clock (10 pages)
Radio-controlled projection clock (13 pages)
Travel radio-controlled projection clock model: rm888p / rm888pu (8 pages)
Radio-controlled projection clock model no.: rm868p/rm868pu (10 pages)
Radio controlled projection clock model : rm813p / rm813pu (uk version) (8 pages)